Development Blog (Week 8)
This is where I was wrapping up everything. I implemented SFX, and Save Data, as well as making some 2D art for a final UI update, and then making a stable build, as well as advertisements and setting up the itch.io page for the game.
Published on January 20, 2020 by Amy Elliott
C# Programming Unity 2D Art Dev Blog College
15 min READ
Please note: The code and content within this blog post is not representative of my current skills.
Week Number & Date: Week 8 - 20/01/20
List of Tasks planned for this week:
This is what I plan to do this week, but I feel it may drag onto the next week, especially the stable build and the publishing of the game.
I’ve divided it all up into what I’ll be focusing on in college and what I’ll be focusing on at home.
College:
- Sound FX
- Save data
- Polish
- Publish and work on game page graphics
Home:
- Coin Graphic
- Game page graphics
- Controller functionality
- Stable build
Current Position -
What did I do this week and why did I do it?
Unity - Sound FX
I feel like this is a really important part of my games development, and to find these sound FX I used a website full of royalty free sound FX called gamesounds.xyz, out of all of the sound FX and music on there, I picked a few which I really liked and made a folder full of them, and I made sure to write down each sound effect/song I used, just in case I had to reference it somewhere later on. (Like my itch.io game page)
Inserting the music was very simple, for button click noises all I needed to do was add an audio source to each button and an OnClick() function which played the click sound.
To get the ‘Game Over’ and ‘You-Win’ voice lines to work, I had to create an Empty Object which I called Voice Lines Manager, which would insert whatever voice lines I needed in there once the game has ended and play it, I got this working by putting the voice lines with the death music on whatever triggers the game over, in this case it was the character, with the character collision script.
The Voice Manager object was referenced in the Game Over manager, which receives the data when it’s game over and feeds it into the voice manager.
I had to write this inside my music scaler script so the game would detect when the music has finished:
if (!SRC.isPlaying && musicFinished == false)
{
    musicFinished = true;
    Debug.Log("Works");
}
Once I found all the music I needed I put it into my project and made everything work with the audio. And the game feels so much more fun to play with audio along with it.
Unity - Save Data
To do this, I began by making a script which I called SaveData, and this is what was in the script.
using System.Collections;
using System.Collections.Generic;
using UnityEngine;

public class SaveData // This script is its own class
{
    // Here I made 3 variables which are basically references to the classes which I need to use
    public _Points points;
    public SaveData saveData;
    public QuestList questList;

    public void saveScore()
    {
        // This is setting the integer of the score, labelling it "Score"
        PlayerPrefs.SetInt("Score", points.score);
        PlayerPrefs.SetInt("Gold", questList.Gold);
    }

    public static void setHighScore(int highscore)
    {
        // This is a static void where we set the highscore, with an input of an integer called highscore
        PlayerPrefs.SetInt("highscore", highscore);
        PlayerPrefs.Save(); // This here sets and saves the highscore, so we can reference it in other scripts
    }

    public static int getHighScore()
    {
        // This here gets the highscore, as a function so we can get it from other places
        if (!PlayerPrefs.HasKey("highscore"))
        {
            return 0;
        }
        return PlayerPrefs.GetInt("highscore");
    }
}
I did struggle with getting odd things working, but in the end I did get everything working fine, along with this script I needed to make everything more efficient when ending the game, since I felt like it was really repetitive and too much to be doing separate disabling of cameras and such on each game over, so I made a Game Over Manager script, this is the script.
using UnityEngine;

public class GameOverManager : MonoBehaviour
{
    // This lengthy amount of different components controls what is enabled and disabled and what is set to what when the game is over
    [Header("MissionFinishedUI")]
    public Camera playerCamera;
    public Camera altCamera;
    public Canvas gameCanvas;
    public Canvas missionFinishedCanvas;
    public Canvas gameOverCanvas;
    public Canvas deathCanvas;
    public GameOver_UIManager deathUIManager;
    public GameOver_UIManager missionFinishedUIManager;
    [Header("Music")]
    public AudioSource musicManager;
    public AudioSource voiceLinesManager;
    [Header("Player")]
    public GameObject player;

    // This public void takes an input of 2 audio clips and a boolean.
    // This is because these variables are different depending on what game over you get.
    public void endGame(AudioClip music, AudioClip voice, bool loseGame)
    {
        // Disabling things
        playerCamera.gameObject.SetActive(false);
        gameCanvas.gameObject.SetActive(false);
        player.SetActive(false);

        // Enabling things
        altCamera.gameObject.SetActive(true);

        // Checking if the player has lost the game or if they have got to the end of the song
        int previousBest = PlayerPrefs.GetInt("highscore");

        if (loseGame)
        {
            gameOverCanvas.gameObject.SetActive(true);
            deathUIManager.updateHighscore(points.score, previousBest);
        }
        else
        {
            missionFinishedCanvas.gameObject.SetActive(true);
            missionFinishedUIManager.updateHighscore(points.score, previousBest);

            // Starting win music
            musicManager.clip = music;
            musicManager.Play();

            voiceLinesManager.clip = voice;
            voiceLinesManager.Play();

            player.transform.position = new Vector3(999, 999, 999);

            // Update highscore
            if (points.score > previousBest)
            {
                PlayerPrefs.SetInt("highscore", points.score);
                PlayerPrefs.Save();
            }
        }
    }
}
Doing this script made everything much more efficient, since the only difference between getting a game over and getting a music finished screen is simply the canvas, the voice lines and the music, so that’s all was different, which is what Refactoring is, I learnt what this word meant recently.
I then used this script, which displayed all of the highscores on the UI.
using System.Collections;
using System.Collections.Generic;
using UnityEngine;
using UnityEngine.UI;

public class GameOver_UIManager : MonoBehaviour
{
    // These are three variables where the UI with the highscore and the score would be displayed
    public GameObject newBestObject;
    public Text previousHighscoreText;
    public Text currentScoreText;

    // This is a function which I can reference whenever there is a highscore.
    // It takes an input of score and current highscore, so those values can be compared.
    public void updateHighscore(int score, int currentHighscore)
    {
        if (score > currentHighscore)
        {
            newBestObject.SetActive(true);
        }

        previousHighscoreText.text = string.Format("Highscore: {0:D10}", currentHighscore);
        currentScoreText.text = string.Format("Score: {0:D10}", score);
    }
}
And finally I made a script which referenced the highscore in the different scene, which was the menu screen, this script is fairly short and easy to understand.
using System.Collections;
using System.Collections.Generic;
using UnityEngine;
using UnityEngine.UI;

public class menuScreenHighscore : MonoBehaviour
{
    void Start()
    {
        int highscore = PlayerPrefs.GetInt("highscore");
        GetComponent<Text>().text = string.Format("Highscore: {0:D10}", highscore);
    }
}
Then I just simply needed to call the function when the game is over.
if (!SRC.isPlaying && musicFinished == false)
{
    musicFinished = true;
    gameOverManager.endGame(winMusic, winVoice, false);
}
After linking up some references and making UI for the highscores in the end screens, my save data was finally finished and working, this was challenging to get working efficiently
Photoshop - Coin Graphic
This was fairly easy to do, I done this at home using Paint Tool Sai, since that runs best on my home PC. I began this by finding a Coin Graphic on google which I can reference and get ideas of colour on.
From looking through the images, I knew I wanted to draw stacked coins, and so that’s what I did, and this is the result:
Unity - Stable Build
Doing this required me to fix all the pesky little bugs, and making sure everything worked as it should do before I upload it to itch.io, eventually, I got myself a build which I was happy with, I made sure to rename it so the game was called Beat City, and then I also made sure I had a logo for it.
To make a logo, I really wasn’t sure what I wanted, I ended up taking a few screenshots of the dissolving cube on the game over screen and that proved to be quite a nice logo!
One thing I had to make sure I did, was I had to make sure that the script which grabs the music components for you was the right one, since before this, to test this game on a college PC, I had to take music from the Resources folder inside the Unity file, which you don’t get access to when you build the game, but that was simple since I wrote both scripts and just commented out whatever one wouldn’t work when I’m at home or at college.
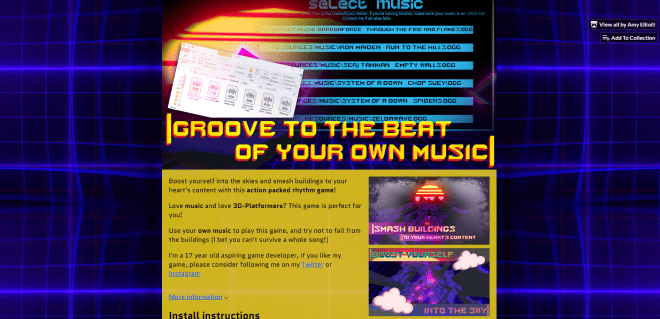
Itch.io/Photoshop - Gameplay Graphics, Advertisement & Project Making
This is a very important part of my project, I would like my game displayed on itch.io and making it look good is VERY IMPORTANT since that is what the player would be drawn in by.
Doing this part includes having screenshots and videos advertising the game, similar to advertisement screenshots you get on any other game which are made to specifically show the fun of the game so the player would want to play it.
Because of the importance of having this to make my game stand out like a polished game, I made a pinterest board.
Game Advertisement Pinterest Board
A lot of these are for mobile games, but I feel like the same principles apply. And a lot of these are art work instead of screenshots of the game, but I wanted to include screenshots of the game which are just edited to make the screenshots look more like screenshots. These also tend to have tag lines, and involve what is included in the game to make the player more excited to download and play the game, so I began to brainstorm some taglines for my game.
I’m not the best with taglines, but I wanted to have at least 4, so I began narrowing them down and picking which one I liked the most.
These are the four I liked the most, I can also use one of these on my Itch.io’s tagline.
After reading through these a few times, I didn’t want to have the repetition of ‘beat’ on Groove to the beat of your own music and Smash buildings to the beat, so I changed the second one to ‘Smash buildings to your heart’s content’ and I felt like this fit more.
I picked ‘Groove to the beat of your own music’ to the itch.io’s tag line.
To begin making the screenshots, I broke these down into what I would expect to see on the screenshot when hearing that tagline.
The reason why I want to have some sort of character in every screenshot is because I feel that would catch a persons attention more than what I have as a main character in my game, which is a cube. But these character illustrations are optional, I may have them or I may not have them.
I feel like these three screenshots are enough, I like them. The one I like the most has to be the ‘Groove to the beat of your own music’ This one looks the best.
I then began to make the cover image for the page, and this is what I made.
I’m quite proud of this cover photo since I love the way that it curves around the sun, it makes it look like it is part of the sun.
I then began writing the install instructions, of course I will have this detailed in the description as well. The underlined words send you to a google drive folder which has a royalty free .OGG file in it, so whoever is struggling with getting their music in .OGG format, they can download and use that, I have also linked an online converter which converts MP3/WAV to OGG files.
After I done that I began writing the description, I made the description short and sweet.
I realized I needed instructions somewhere on how to insert music into the game, so I added it to the install instructions.
I made everything on the itch page look nice by adding pictures and changing the colours, and I’m really proud with how it’s turned out.
What did I find difficult or easy?
I found it easy to upload my game to itch and make everything look nice and well presented, since I made the screenshots, and I feel they made the game look much more complete. I was struggling with how I wanted the background of my game to look, and I feel like I could’ve done a better job at it.
Finding the perfect build for my game wasn’t hard, but it was a tedious task, I had to make sure everything was perfect in the build, it only took 2 separate builds to get one which is okay for publishing.
I did find the save data difficult to do, even though the initial task is rather easy to do, I was having trouble because I named my variables weird and I got confused. I found putting sound effects into my game easy, and I had great fun with it.
What tasks didn’t I complete from this week?
I’ve got everything completed!